Monday, 25 November 2013

Parsnip, Ginger & Orange Muffins

Parsnip, Ginger & Orange Muffins


Every Saturday, in the east end of London up near Hackney, a generally quiet street becomes completely jammed with people for the Broadway Market.  There are all types of stalls here including fresh produce, meat and fish as well as prepared meals from Ghana and a variety of bakery stalls.
The Fiendish & Goode stall sells all kind of small cakes and we were taken by the parsnip & ginger cake.  I'm a sucker for using vegetables in cakes, having made my students make butternut squash scones, beetroot & chocolate muffins, and carrot & sweet potato cakes, but I had never heard of or used parsnip before, so this gave me an idea to try.
After a variety of trials, I finalised the recipe for a photo shoot at the completion of the Food Styling course I completed at Leith’s School of Food & Wine, so many thanks go to Stuart Ovenden for the lovely photo and the training & advice given to us by Jennifer Joyce & Sarah Cook.

Mini Parsnip, Ginger & Orange Cakes

2 eggs
120g light soft brown sugar
175ml oil
50g unsweetened plain yoghurt
130g plain flour
1/2 tsp bicarbonate of soda (baking soda)
2 tsp ground ginger
180g grated parsnip (about 2 large parsnips)
80g chopped stem ginger (in syrup)
Zest of 1 orange

Cream cheese icing

50g softened butter
100g cream cheese (e.g. Philadelphia)
300g icing sugar
1 tsp orange juice

Glace orange peel (for decoration)

1 orange
1 cup water
1 cup white granulated or caster sugar

Directions

1.    Heat oven to 180C/160C fan.
2.   Using an electric mixer, beat eggs and sugar until creamy and pale.
3.   Combine the oil and yoghurt and beat into egg mixture, slowly pouring in a steady stream.
4.   Sift the dry ingredients and add to the mixture (including the wholemeal bran from the sieve) and mix well.
5.    Add the grated parsnip and chopped stem ginger and stir to combine, the mixture should be thick and tacky.
6.   Lightly spray a 12 hole mini sandwich tin with cake release spray (or a muffin tin) and share the mixture evenly between the 12 holes (each hole should be about 3/4 full).
7.    Bake in oven for 35 minutes until golden brown and spring back when lightly pressed.
8.   Allow to stand for 5 minutes before turning out of the muffin tin.  Cool completely then ice with cream cheese icing.

Cream cheese icing

1.    Beat the butter and cream cheese together until smooth.
2.   Beat in the icing sugar (adding small amounts at a time to avoid creating an icing sugar cloud) and the orange juice.
3.   Ice cakes when completely cool & decorate with glace orange peel (if desired).

Glace orange peel

1.    Carefully remove the orange skin and cut most of the white pith from the skin before cutting into fine strips (using a zester is too fine).
2.   Place the orange peel into a small saucepan, cover with water and simmer for 20 minutes, then drain.
3.   Put the water & sugar into the saucepan and heat over a medium heat to dissolve the sugar and then return the orange peel to the saucepan and simmer for another 20-30 minutes until slightly syrupy.


Tuesday, 1 October 2013

Lazy Bread


I love making bread, the workout you get from kneading, the variety of shapes, styles and flavours you can make, the inviting aroma wafting through the house as it bakes  and, best of all, eating it while still warm. The problem is that it is often difficult to find the time to go through the process of mixing, kneading, 1st proving, shaping, 2nd proving & then finally baking.  This recipe eliminates many of those stages leaving only the mixing and baking, so it certainly makes it the ultimate lazy bread.
It is a combination of Annabelle Langbein's 'Busy People's Bread' (in her book, The Free-Range Cook) and a fragrant multi-seed loaf served at Palm's Cafe restaurant in Dunedin. I've been trying to perfect it for about a year, adjusting the amount of yeast and liquid as well as experimenting with baking temperatures and times to ensure a consistent outcome that eliminates sinking. I'm not sure it is completely perfect as there is still a slight dip when cooled, but it is always tasty and has a spongy, dense inner texture with a firm, dark crust.  It is great thinly sliced for sandwiches or cut a bit thicker and toasted, spread with butter and marmite.

You can always vary the seeds to your own liking (including sunflower seeds, poppy seeds or others that may take your fancy) or use a packet of pre-mixed seeds.

220ml boiling water
2tsp dark treacle (or you can use honey, but the treacle adds more flavour)
220ml cold water
1tbsp (10g) dried yeast granules (NOT quick yeast)
200g strong white flour
200g plain wholemeal flour
1 1/2tsp salt
1/2 tsp caraway seeds (optional)
45g linseeds
40g sesame seeds
45g pumpkin seeds (plus 2tbsp extra)

1.    Preheat oven to 80C (fan 50C) and grease a 25x10cm loaf tin well (I use cake release spray).
2.    In a large bowl, mix the boiling water with the treacle to dissolve.  Add the cold water and sprinkle over the yeast and put aside for 10 minutes so the yeast activates and becomes light and foamy.
3.    Whisk the yeast mixture then add all of the remaining ingredients (except the extra pumpkin seeds) and mix with a large spoon until evenly combined (The mixture will be a very wet batter that looks more like a cake mix than a bread dough).
4.    Pour the mixture into the prepared loaf tin, spread evenly and flatten the top.  Sprinkle the 2tbsp extra pumpkin seeds (or any seeds of your choice) over the top of the loaf and run a sharp knife through the top of the loaf in at least 3 or 4 places so the loaf rises evenly without splitting.
5.    Bake for 20 minutes at 80C (fan 50C) and then turn up the oven to 180C (fan 150C) and bake for a further 60-75 minutes.  When cooked, the loaf will sound hollow when tapped and will be a dark golden brown.  
6.    Turn out of the tin while still hot and leave to cool.  

7.    This bread stays fresh for several days and toasts well.

Tuesday, 12 February 2013

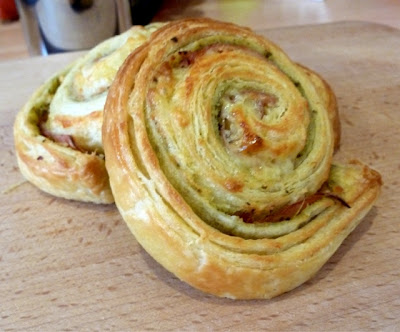
Ham, pesto & cheddar swirls

In my home town, Dunedin, Tangente Cafe was a favourite spot for weekend brunch. Not only did they make fantastic cafe mochas with Whittaker's Sante bars, but my main reason to go there was their 'Spiralled Eggs'. These were a freshly baked savoury swirl, lightly toasted, topped with a gooey poached egg & a rich hollandaise sauce. I remembered them being so light and flakey with fillings like ham & avocado or pesto & bacon.
When my GCSE students were looking for ideas of products that could be sold from the counter of a coffee shop, I remembered these and we managed to find the recipe in the 'Ask a Chef' feature of The Otago Daily Times, the local Dunedin newspaper. I was disappointed to find that they were made with a scone dough, which really wasn't how I had envisaged them being made, so I needed to make my own version.

With the help of Signe Johansen's Danish Pastry from her book, Scandilicious Baking, I created my own savoury swirls. They aren't a quick bake, but are well worth the effort. I generally make the dough on a Friday or Saturday night, so that I then have a full day for the laminating and filling.


Ham, pesto & cheddar swirls

Danish pastry dough

250-300ml milk
500g strong white flour
10g fine sea salt
2 tbsp caster sugar
7g fast action dried yeast, or active dried yeast
1 medium egg, beaten
250g unsalted butter, chilled

Filling

5 tbsp basil pesto
180g thinly sliced ham
120g grated cheddar cheese

Glaze

1 egg, beaten

Directions

1.        Heat 250ml milk in a small saucepan until scalding point (you should see small bubbles around the edge), then allow to cool. If using active dried yeast, you will need to activate it first by sprinkling over the warm (not hot) milk and leaving in a warm place for about 10minutes until foamy.
2.        Sift the flour, salt and sugar together in a large bowl, sprinkle in the fast action yeast and stir through (if using dried yeast it will be in the milk).
3.        Make a well in the centre, add the beaten egg and then the milk (which should be warm rather than hot to the touch).
4.        Stir everything together until the mixture comes off the sides of the bowl, adding as much of the remaining 50ml of milk as you think is needed, until the dough looks 'doughy'.  Note: I usually do the mixing of the dough with an electric mixer using a dough hook on a slow speed until the mixture comes away from the side of the bowl and the dough is no longer sticky.
5.        Shape the dough into a rough rectangle shape, cover with lightly oiled cling film and refrigerate over night.
6.        Take the dough out of the fridge and allow to come to room temperature (30-60 minutes depending on how cold your fridge is).
7.        Using a cheese slicer or very sharp knife, cut the butter in to thin slices and arrange them in a rectangle about 10x25cm on a sheet of baking parchment.
8.        Lightly flour your work surface and your dough and roll the dough out to a rectangle about 45x15cm and about 1cm thick. Put the parchment paper, butter side down, at one end of the dough leaving a border of a couple of centimetres between the butter and edge of the dough. Peel back the parchment, leaving the butter in place so that two-thirds of the dough is covered in butter and there are no large lumps sticking out.
9.        Fold the unbuttered third of dough over to sit on top of half of the buttered dough and then fold the remaining buttered dough on top, so that you end up with a rectangle of dough a third of the original size but three times as thick, like you had folded a letter in thirds to go in an envelope.
10.    Turn the dough 90 degrees and roll out again to a rectangle about 45cm x 15cm and 1cm thick. Fold in thirds again, cover with cling film and refrigerate for one hour.
11.    Remove from the fridge and roll out on a lightly floured surface to a rectangle about 50cm x 10-15cm and 1cm thick. Now fold both shorter ends in so they meet in the middle and then fold one half on top of the other, as if you are closing a book.
12.    Turn the dough 90 degrees and roll out again to a long rectangle about 1cm thick. Fold in thirds one last time, cover in cling film and refrigerate for about an hour or so.
13.    Finally, roll the dough out on a lightly floured surface to a rectangle about 60cm x 40cm, turn the dough so that one of the 60cm sides is towards you.
14.    Spread the pesto over the dough so that it is evenly covered over the whole rectangle. Evenly cover the dough with the ham and then scatter over the cheese.
15.    Starting at the long edge, roll the dough up keeping the filling inside.
16.    Line a large baking sheet with baking parchment, slice the rolled dough into 2-3cm slices and place on the tray with the cut-side up, leaving a 2cm gap. Cover and leave to prove in a warm place for 20 minutes. While they are proving, heat the oven to 230C/210C fan/gas mark 8.
17.    Brush the top & sides with beaten egg to glaze and bake for 5 minutes before reducing the heat to 200C/180Cfan/gas mark 6 for a further 7 minutes until they are golden brown and crispy.
18.    Leave to cool on a wire rack for a little while before enjoying. They will keep well in the fridge for 3 days and make great work lunches.

Variations

There are any number if variations you could make of these; pesto, sundried tomatoes and cheese works well and you could always try the ham & avocado version from Tangente.

Sunday, 29 January 2012

Carrot & Kumara (Sweet Potato) Muffins


In Guildford there is a cafe that I enjoy visiting, Caracoli, at the top of the high street in the Steamer Trading cookshop.  They do try to make good coffee, not always successfully.  One thing they do very well is their assortment of baked goods and I particularly enjoy their Carrot Cake Muffins.  It is lovely sitting on their terrace in the sunshine thumbing through the food magazines they have available to read.

Their Carrot Cake Muffins reminded me that when completing my chef training back in Christchurch Polytechnic we had made a Carrot & Kumara (Sweet Potato) Loaf.  I thought that mixture would probably make some lovely muffins also, but I needed to find a recipe first.  After searching around the internet I wasn’t really convinced by any of the recipes I found, but on my last visit home to New Zealand I managed to find my old recipe notebook from when I did my chef training and there it was, the Carrot & Kumara Loaf with Cream Cheese Icing.

The problem I now had was that they don’t have Kumara in England, so had to use Sweet Potato instead.  They do have a purple skinned sweet potato (Bush Bok) variety here in England, which is the closest I can find to Kumara and has a similar consistency to Kumara, but the Golden Sweet Potato would probably work fine also.

These muffins have a beautiful variety of textures with chopped nuts, sultanas and the grated carrot and sweet potato and the spices used give it a lovely inviting aroma.  These are very moreish and I could probably sit and eat them all, but think I’d better take them into school so that I don’t scoff the lot. 

Enjoy!


Carrot & Kumara (Sweet Potato) Muffins


2 eggs
120g soft brown sugar
195ml oil
50ml yoghurt
65g plain flour
65g wholemeal flour
½ tsp bicarbonate of soda (baking soda)
1 tsp baking powder
1 ½ tsp cinnamon
½ tsp nutmeg
Pinch ground cloves
90g grated carrots (about 1 large carrot)
90g grated kumara/sweet potato (about 1 medium kumara)
80g raisins or sultanas
80g walnuts, roughly chopped
40g almonds, roughly chopped.
1.    Preheat oven to 1600 fanbake (1800 bake).
2.   Beat eggs and sugar until creamy and pale.
3.   Combine the oil and yoghurt and beat into egg mixture, slowly pouring in a steady stream.
4.   Sift the dry ingredients and add to the mix (including the wholemeal bran from the sieve) and mix well.
5.    Add the grated carrot, kumara, raisins, walnuts and almonds and stir to combine, the mixture should be thick and tacky.
6.   Line a 12 hole muffin tin and share the mixture evenly between the 12 holes (each hole should be about ¾ full). 
7.    Bake in oven for 35 minutes until brown and spring back when lightly pressed.  All to stand for 5 minutes before turning out of the muffin tin.  Cool completely then ice with cream cheese icing.

Cream Cheese Icing


50g softened butter
100g cream cheese
300g icing sugar
1 tsp lemon juice
¼ tsp vanilla essence
1.    Beat together the cream cheese and butter until smooth.
2.   Beat in the icing sugar (adding small amounts at a time to avoid creating an icing sugar cloud) and the lemon juice and vanilla essence.

3.   Ice muffins when completely cool.

Saturday, 18 June 2011

Afghans

Afghans are my absolute favourite sweet biscuit.  They are chocolatey and sweet, but not sickening and then they are crunchy, crumbly and melt in the mouth all at the same time.  They have the unusual addition of cornflakes in the recipe which helps to give them their great crunch.  It isn’t clear how this recipe originated or where these biscuits got their name from, but the trusty Edmonds cookbook has provided the recipe for many Kiwi bakers for decades.  


These are a favourite in many New Zealand cafes, where they are made huge and have the traditional walnut piece on top.  I have made these since I was young and generally leave off the walnut, usually because I don’t have any in my cupboard when I make them, but they are great either way.  These are fantastic biscuits and won’t last long once you have made them.  I share them with my workmates or I’d eat them all in a couple of days.


They are very easy to make but ensure that you cream the butter and sugar well or the biscuits will spread slightly as they cook, but they still taste good this way anyway.


Afghans

200g softened butter
120g (½ cup) white sugar
190g (1 ¼ cups) plain white flour
33g (¼ cup) cocoa powder
50g (2 cups) cornflakes
Icing
125g (1 cup) icing sugar
5g (1 Tbsp) cocoa powder
¼ tsp butter
30ml (2 Tbsp) hot water (approximately)


  1. Preheat oven to 1800C fanbake.
  2. In a large bowl, cream together the butter and sugar until light and fluffy.
  3. Sift flour and cocoa and stir into the creamed mixture until well combined.
  4. Fold in the cornflakes.
  5. Shape tablespoonfuls of mixture into balls and place on a greased or lined baking tray.  Press down lightly with the back of a fork.
  6. Bake for 15 minutes or until set.
  7. Remove from oven and transfer to a cooling rack to cool.
  8. When cold, ice with chocolate icing and decorate with walnut pieces in desired.

Icing: Sift icing sugar and cocoa into a bowl and add the butter.  Mix in enough water to mix to a spreadable consistency.

Sunday, 17 April 2011

Hot Cross Buns


As much as I like chocolate, my favourite thing about Easter is Hot Cross Buns.  Bought ones are okay, but homemade ones are almost addictive.  It is funny that I love them so much, but don’t ever make them at any other time of the year.  It would be easy enough to make them minus the crosses, but then they just don’t have the same appeal when they aren’t Hot Cross Buns. 

When we were kids my Mum would make them every Easter and they were a real treat come Good Friday and then we would eat them throughout Easter.  We’ve now got a bit relaxed on when we are allowed to eat them and pretty much have them over the weeks leading up to Easter, hot from the oven with lots of butter for breakfast.  I always have a base first and then finish with a top, my favourite part, maybe that has something to do with the crosses. 

Our family has pretty much used the same recipe since we were kids, but have made a few adjustments over the years using ideas from other Hot Cross Bun recipes I have seen in various magazines and now I think we have the perfect recipe.

Try making these yourself and then see if you can resist having a fresh one straight from the oven slathered with butter.

Hot Cross Buns

1 ¼ cups milk (310ml)
Zest of 1 orange
3 cardamon pods, bashed
¼ cup sugar (50g)
1 ½ tablespoons dried yeast (11g)
4 ½ cups white bread flour (690g)
½ teaspoon salt
1 teaspoon mixed spice
1 teaspoon ground cinnamon
1 teaspoon ground ginger
½ teaspoon ground cloves (you could use 2 whole cloves instead when heating the milk)
¼ teaspoon grated nutmeg
125g butter
2 eggs
180g mixed fruit
80g citrus peel
40g chopped glace cherries

Crosses
½ cup plain flour
1 tablespoon melted butter or oil
5-6 tablespoons water

Glaze
2 tablespoons milk
2 tablespoons sugar


  1. Place milk, orange zest, and cardamom pods (and whole cloves, if using) into a small saucepan and heat to scalding point.  Remove from heat, strain, add the sugar and cool to lukewarm.
  2. Sprinkle on the yeast and mix briefly with a fork then leave in a warm place for about 10 minutes until frothy.
  3. Sift together the flour, salt and spices.  Place half in a large bowl and make a well in the centre.
  4. Add the yeast mixture, melted butter and beaten eggs and beat well with a wooden spoon until smooth.  Add the mixed fruit, citrus peel and glace cherries (or any combination of fruit you prefer) and work in the remaining flour to form a soft dough.
  5. Turn out onto a lightly floured work surface and knead until smooth and still soft.
  6. Place the dough in a greased bowl, cover with a cloth and leave to rise in a warm place until doubled in bulk, about 1 hour.
  7. Turn onto a lightly floured work surface and knead lightly.
  8. Divide into 18 even sized pieces.  Shape into balls and place slightly apart on a greased (or lined) baking tray.  Cover and leave to rise again until double, about 20 minutes.
  9. Make the dough for the crosses by mixing the flour, butter (or oil) and enough water for the mixture to be piped.
  10. Pipe crosses on each risen bun.
  11. Bake at 2000C (1800C fan bake) for 15-20 minutes, remove and brush the milk and sugar mixture over the buns to glaze.  Return to the oven and bake for a further 5 minutes until golden brown.  Enjoy!


Friday, 15 April 2011

Marshmallow Easter Eggs

I absolutely adore Marshmallow Easter Eggs, their soft, fluffy centres and the thin, crisp coating of chocolate on the outside.  They are definitely something I miss when away from New Zealand at Easter.  A few years back the Foodtown magazine published a recipe for Marshmallow Easter Eggs and since then I’ve used it many times to make them for myself and as gifts for others.

The recipe generally works well, but having used it with a number of my students they always discover many ways for to trip things up.  It really does come down to accurate measuring and accurate timing, so follow the recipe carefully and you’ll have your own Marshmallow Easter Eggs to enjoy!

Marshmallow Easter Eggs

Moulding
Flour
1 egg

Marshmallow
¼ cup water
1 tablespoon (7g) powdered gelatine (or 4 sheets of leaf gelatine)
1 cup granulated sugar (200g)
⅓ cup extra water
Food colouring

Coating
375g cooking chocolate

Spread flour evenly in a baking/roasting dish about 2cm deep.  Press the egg down into the flour about halfway to make about 14 oval-shaped hollows, leaving a 2cm gap between each hollow.

 If using powdered gelatine, place the ¼ cup water in a small bowl and sprinkle the gelatine over and set aside to swell.  If using the leaf gelatine, place the 4 leaves in a bowl and cover with plenty of water and leave to soften for about 5 minutes.
Place the sugar and ⅓ cup water (plus the ¼ cup water, if using leaf gelatine) in a small saucepan and stir over a low heat until the sugar has dissolved.
Add the gelatine (squeeze out excess water from leaf gelatine) and stir until dissolved.
Bring to the boil and boil steadily for 10 minutes (if using a thermometer it reaches 1100C), be careful that it doesn’t overflow or cook at too high temperature, it will burn.
Remove from the heat and cool for 5 minutes before beating.
 Pour the marshmallow into a heatproof bowl and beat with an electric beater on high speed for 2-3 minutes, until a thick, creamy consistency that is still pourable.  Add food colouring towards the end of beating, if using.  Be careful not to overbeat or it will go hard.
Transfer mixture to a jug and pour the marshmallow into the hollows in the flour, bringing to almost to the top.
Place marshmallow in the fridge to set, about 30 minutes, or out of fridge for about 5-7 hours or overnight.
Line a baking tray with tin foil.
Melt the chocolate in a heat proof bowl over a saucepan of simmering water, making sure the bowl doesn’t touch the water.  You can also melt the chocolate in the microwave, but be careful not to burn it.  If you use regular eating chocolate, add 50g of vegetable shortening to the chocolate while melting, it makes it a lot easier to coat the marshmallow.
Using a fork, gently remove marshmallow from the flour, brushing off any excess flour, dip into the melted chocolate until they are evenly coated.  Place on prepared tray to set.

Eggs can be left as halves or joined to make whole eggs.  Enjoy either way!